By default, Gravity Forms outputs it’s forms in a vertical (or column) format. This just means that the form fields are stacked on top of one another all the way down the form. This is ideal for most forms but there are some cases where you may want to display your form horizontally instead. This means the form fields are displayed side by side, in a row. You can do this with Gravity Forms classes.
Gravity Forms can actually get you a decent way towards this goal using the powerful Gravity Forms CSS Ready Class. This method of creating horizontal forms does have some limitations. Here’s an example using the helper styles we provide later in this tutorial.
Steps
- Add “gf_simple_horizontal” to the Form’s CSS Class Name Setting
- Add “gf_inline” to each Field’s CSS Class Name Setting
- (optional) Hide the Field Label and Sub Labels
- (optional) Add Helper Styles
1. Add “gf_simple_horizontal” to the Form’s CSS Class Name Setting
For this tutorial, we’ll assume you’ve already used the Gravity Forms form builder to create a form. To get started, visit the Form Settings for the form you want to convert and add the “gf_simple_horizontal” class to the CSS Class Name setting.
2. Add “gf_inline” to each Field’s CSS Class Name Setting
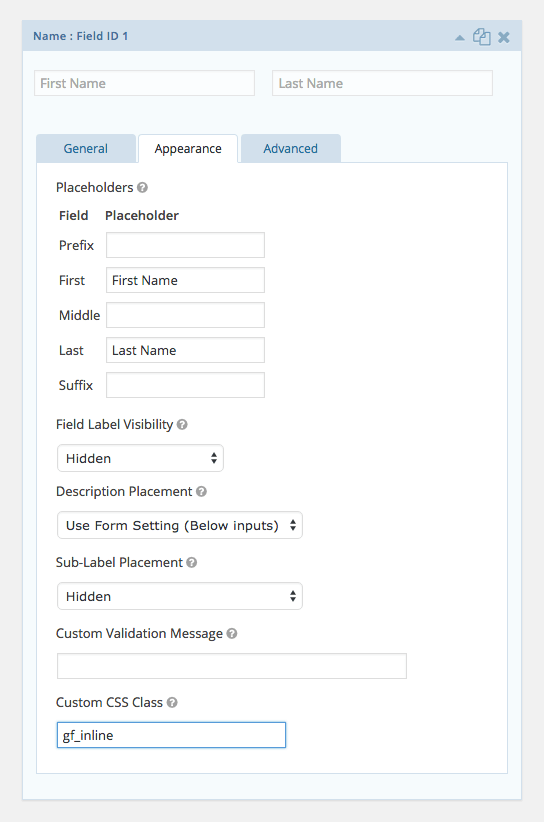
Next, visit the Appearance tab of each field in the form and add the “gf_inline” class to the Custom CSS Class field.
At this point your Gravity Form is now a horizontal form!
There are two additional steps we can take to make this even more streamlined.
3. (optional) Hide the Field Label and Sub Labels
In many cases when implementing a horizontal form, you are putting it in location without a ton of room. We can hide the labels and use placeholders to save a little space. Go ahead and follow our tutorial on how to hide Gravity Form field labels when using placeholders.
Once you’re added support for removing field labels and sublabels, visit the Appearance tab on each field and set visibility to “Hidden” in the Field Label Visibility and Sub-Label Placement dropdown fields.
It will look something like the screenshot below:
4. (optional) Add Helper Styles
Things are looking good but you might notice that some of the fields aren’t properly aligned and the submit button is larger than the inputs. Here are some simple helper styles that can act as a starting point to get your form styled how you want.
Basically, it involves using Gravity Forms alignment settings (column layout) using gf_left_half (left column), gf_right_half (right column), gf_middle_third, gf_left_third, or gf_right_third based on how you’d like to align it. This is an easy way to play around with the form layout and column layout. You can also use gf_list_2col to turn a checkbox list into an equally-spaced two-column format on the front-end.
This code can be copied and pasted into your theme’s style.css stylesheet file. Keep in mind, theme styles are not loaded in preview so you might want to check out GP Live Preview for an easy way to preview your forms directly in your WordPress theme.
View this code snippet on GitHub.Limitations
- This method works best for simple forms with only a few fields.
- This method isn’t a polished solution but it will get you (exactly) 93% of the way there without add-ons.
- This method requires some additional customization to handle responsive styling e.g. for column layouts.
The pros are that it’s available with the Gravity Forms WordPress plugin out of the box and doesn’t require too much effort to get everything looking just right without using add-ons.
What questions do you still have?
Do you still have any questions about how to build horizontal forms with the Gravity Forms plugin in WordPress? We’d love to know what they are. Unfortunately, we are not able to provide custom styling assistance.


