Creating one static form to handle every single use and edge case is hard. Gravity Forms conditional logic fixes that, letting you adapt your forms based on user input or conditions.

Basically, conditional logic lets you do “stuff” differently based on how someone fills out a form or other information, like the time of day or day of the week.
With that power in hand, you can unlock all sorts of advanced use cases for your WordPress forms.
Once you master conditional logic, you’ll be able to simplify and optimize your workflows, create more personalized forms, better handle payments, and just generally get more from Gravity Forms.
In this post, we’re going to help you become a Gravity Forms conditional logic wizard. We’ll start with a general introduction to conditional logic in Gravity Forms.
Then, we’ll explore a ton of real-world use cases for conditional logic in Gravity Forms, like early-bird pricing for payment forms, role-based user registration, and lots more.
You’ll need our suite of plugins to use this article. Buy Gravity Perks today to get conditional logic wizardry with all 33 of our galatic Gravity Forms plugins!
How Conditional Logic Helps You Build Better WordPress Forms
Conditional logic helps you create more powerful, personalized forms without needing to create separate forms for every edge case. This helps you…
- Eliminate extraneous fields – automatically hide fields that don’t apply to the person filling out the form.
- Personalize your forms – display fields that are personalized to each user.
- Create better notification workflows – route your notifications more intelligently by sending different notifications based on how someone filled out a form or the time/date.
- Create better web workflows – process submissions differently based on their content or time of day. For example, giving certain users a higher user role via your custom user registration form.
- Set up smarter pricing – create smarter pricing for payment forms, like different prices based on a person’s age or when they’re submitting the form.
How to Use the Core Gravity Forms Conditional Logic
Below, you’ll learn how to use conditional logic rules for three areas in Gravity Forms:
- Fields
- Notifications
- Feeds
All these features are available in the core Gravity Forms plugin.
How to Use Gravity Forms Conditional Logic for Form Fields
When most people think of Gravity Forms conditional logic, they’re probably picturing using conditional logic to show or hide fields based on how a person filled out previous fields.
For example, if you have a checkbox where users can subscribe to your email list, you could display additional conditional fields for people to indicate their interests but only after they first agree to receive your email list.
To add field conditional logic to a form field:
- Click on a field to expand its settings.
- Go to the Advanced tab.
- Check the box to Enable Conditional Logic.
After checking the box, you’ll see new options where you can show or hide the field based on the value in a previous field. You can also click the + icon to add multiple conditions and select whether all of the conditions must be met or just some:

How to Use Gravity Forms Conditional Logic for Notifications
Gravity Forms conditional logic isn’t limited to just showing or hiding fields, you can also use it to power your backend notifications.
For example, you can send notification emails to different addresses and/or include different content in the body of the email based on how someone filled out a form.
To set up conditional logic for Gravity Forms notifications, go to Settings → Notifications while in the form editor. Then, create a new notification or edit an existing one.
At the bottom of the notification interface, you’ll see a Conditional Logic checkbox. When checked, you’ll see new options to only send this notification if it matches some or all fields:

How to Use Gravity Forms Conditional Logic for Feeds
Finally, you can also use Gravity Forms conditional logic to handle your feeds.
If you’re not familiar with this term, a “feed” is essentially a notification that sends information to an external service.
In this case, external means anything outside Gravity Forms. For example, a feed could be sending…
- User information to WordPress for account registration.
- Emails and other data to your email marketing service or CRM.
- A support request to your ticketing service, like Help Scout.
- A file to your storage service, like Dropbox.
Feeds are a big part of what makes Gravity Forms so flexible, and being able to conditionally handle those feeds opens up a whole new world of flexibility for your forms.
To create feeds for your form, you’ll need to be using a Gravity Forms add-on that supports feeds. For example, the Gravity Forms User Registration add-on:

Once you create a feed, you can scroll to the bottom of its settings to enable conditional logic for that feed:

Gravity Forms Conditional Logic Not Working?
If you followed the steps above but conditional logic is not working, a common culprit is your site’s JavaScript. Specifically, jQuery. You can learn more about the issue in this help article.
How to Extend Gravity Forms Conditional Logic With Gravity Perks
While the native Gravity Forms conditional logic is already flexible, you can take conditional logic even further with the conditional logic extensions in Gravity Perks’ collection of 32 Gravity Forms add-ons:
- Conditional Pricing – add conditional prices to your Gravity Forms Product fields.
- Conditional Logic Dates – conditionally show/hide fields based on the date, day of the week, time of day, etc.
- Populate Anything – conditionally load data using filtering based on the choices a user has made.
Get all the Perks in one bundle! Buy Gravity Perks today and get instant access to all 33 of our Gravity Forms plugins.
How to Create Conditional Pricing in Gravity Forms
If you’re using Gravity Forms to process payments, the GP Conditional Pricing perk lets you create flexible pricing levels for your Product fields without needing to create twenty different Product fields for every situation.
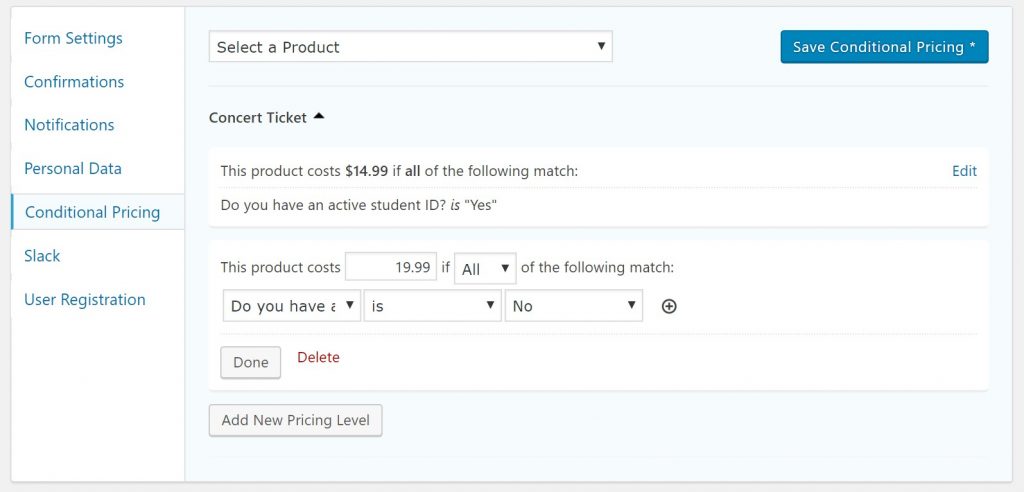
To use it, open a form where you’ve included at least one Product field. Then, go to Settings → Conditional Pricing:

From there…
- Choose the Product field to which you want to add conditional pricing to from the drop-down.
- Enter different prices depending on how a person has filled out the form using conditional logic.
For this example, the product is a concert ticket and we’re using conditional logic to show a different price depending on whether or not the purchaser has an active student ID. The ticket costs…
- $14.99 if they say YES
- $19.99 per they say NO
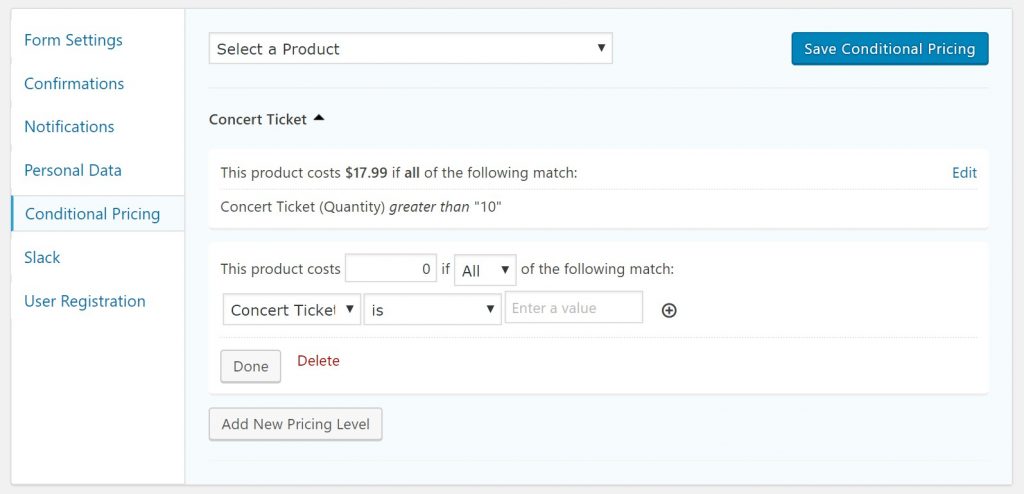
You can also create conditional pricing rules based on quantity. For example, if a person purchases more than ten tickets, you could offer a lower price per ticket:
How to Use Conditional Logic Based on Date or Time of Day in Gravity Forms
With the GP Conditional Logic Dates perk, you can show or hide fields based on dates or the time of day, including the…
- Date that a user selected in a date picker field
- Day of the week
- Day that the form was submitted
- Time of day
To use conditional logic dates, enable the regular Gravity Forms conditional logic for a form field.
You’ll now get two new options for date-based conditional logic:
- Any date picker field – you can choose a specific day or use merge tags. For example, {saturday} or {today:+2 weeks}.
- The current time of day – e.g. before 12:30 pm
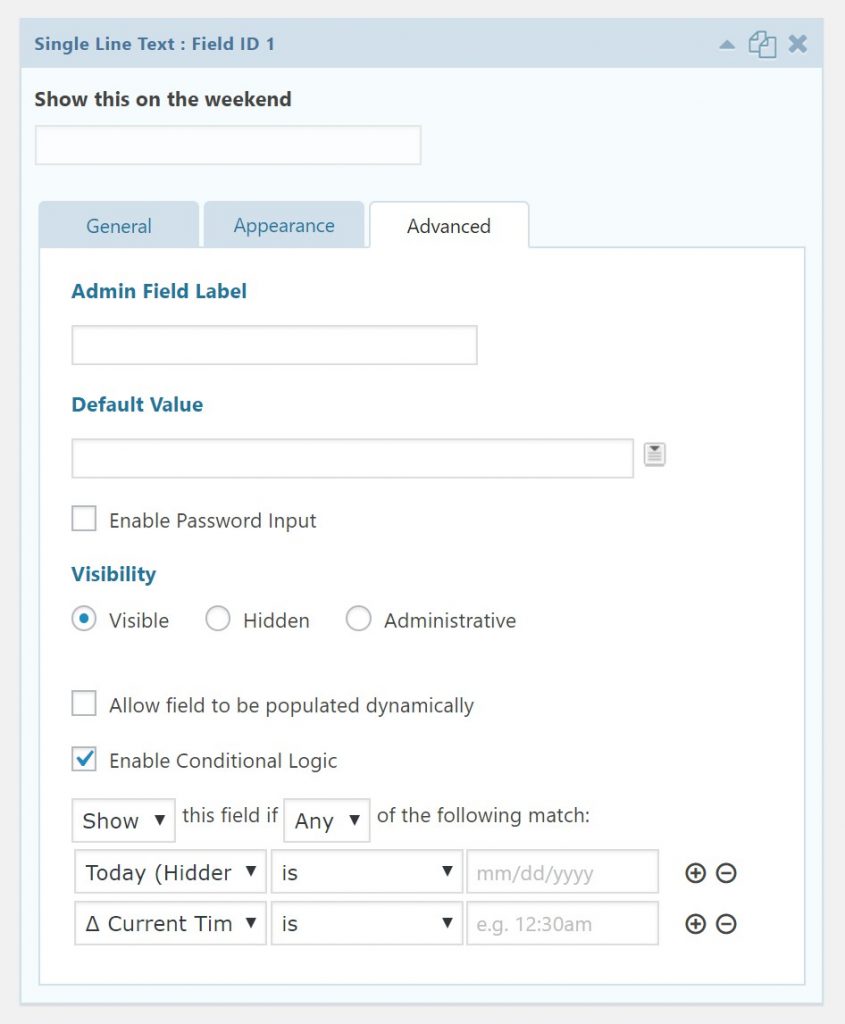
For example, if you want to only show a field on the weekend, you could add {saturday} and {sunday}:

You also don’t need to make the date picker field visible on the front-end to use dates in your forms. If you just want to use date-based conditional logic without making anything visible, you can:
- Add a Date field.
- Set the Default Value in the Advanced tab equal to {date_mdy} to populate it with the current date.
- Apply the gf_invisible CSS class to the field to hide it from end users.

You can also use time and date-based conditional logic for form notifications or feeds.
For example, if you have a form to process customer support requests, you could conditionally send notifications to different support teams based on the date or time of day. For example, divert form notifications to…
- Your weekend support team on the weekends.
- Your after-hours support team after 5 pm.
- Etc.
How to Conditionally Populate Forms With Data in Gravity Forms
Another way to create conditional logic in your forms is to display different data based on the choices a user has made.
For example, you could populate a drop-down list with different options based on the response to a previous form field.
A real-life use case of this would be:
- An Author drop-down field.
- When a user selects an author from the drop-down, the next drop-down field automatically populates its choices with the books from that specific author.
To set this up, you can use the GF Populate Anything perk. This perk lets you populate field choices and values with data from anywhere on your site, including…
- Posts
- Users
- Taxonomies
- Terms
- Gravity Forms entries
- Databases
Once you activate the perk, you can start dynamically populating fields by following these steps:
- Add a form field that supports choices. Examples are drop-downs, radio buttons, checkboxes, text-based fields.
- Check the box to Populate value dynamically.
- Choose your input Type. For example, you could populate it with posts, taxonomies, other Gravity Forms entries, etc.
- Add filters to display specific objects (Optional).
- Use the Value Templates to choose what information to display for those objects.

You can learn more about using the GP Populate Anything perk in this detailed tutorial.
Eight Real-Life Use Cases for Gravity Forms Conditional Logic
With a feature as flexible as Gravity Forms conditional logic, it can sometimes be difficult to envision how you can actually apply this feature to real-life use cases.
To help, let’s finish things out with a look at eight real use cases and how you can set them up with Gravity Forms conditional logic and/or some of the Gravity Perks extensions.
1. Apply Age-Based Pricing
If you’re selling products with Gravity Forms, you can use the GP Date Time Calculator and GP Conditional Pricing perks to automatically display age-based pricing based on a user’s date of birth.
For example, you can automatically apply senior or student discounts based on each form submitter’s age.
First, add a Date picker field and name it Date of Birth. This lets a person choose their date of birth.
Then, create a Number field and…
- Select Enable Calculation
- Enter {Date of Birth:1:age} in the formula to automatically calculate a person’s age based on their date of birth.
Finally, create a Product field for the item you want to sell. Then…
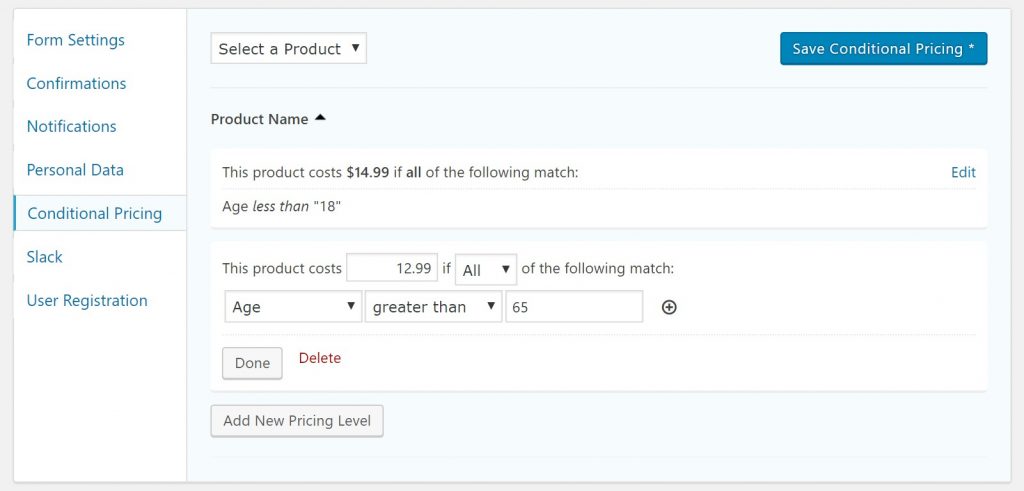
- Go to Settings → Conditional Pricing.
- Select your product from the drop-down.
- Create your conditional price rules based on the Age field.
2. Offer Early-Bird Pricing Discounts or Rush Pricing Surcharges
Early-bird pricing is a common strategy for live events, like conferences and concerts. Essentially, if people purchase before a certain date, they’ll pay less. Or, you could also apply these same principles in reverse to create higher rush pricing if people wait too long to purchase.
To set up date-based pricing in either direction, you can use the GP Conditional Logic Dates and GP Conditional Pricing perks.
First, you need to create a hidden date field that contains the current date. As you saw earlier, here’s how to set this up:
- Create a regular Date field.
- Go to the Advanced tab and set its Default Value equal to {date_mdy}.
- Apply the gf_invisible CSS class to hide the field from end users.
Then, create your Product field and set the base price for the item. After that, go to Settings → Conditional Pricing. There, you can create your pricing rules based on the date and/or time that a person makes their purchase:

3. Offer Conditional Discounts
Beyond early-bird pricing, you can also offer other conditional discounts like discounts for…
- Purchasing multiple years/months upfront.
- Choosing a specific product.
- Being a registered member.
To set up all kinds of discounts, you can use the GF eCommerce Fields perk.
It lets you add a new Discount field to offer a flat-rate or percentage discount.
Once you have your Discount field, you can then apply any of the conditional logic principles you learned about above.
For example, you could use date-based conditional logic to offer specific discounts for people who book during the week versus on the weekend.
Again, to add this type of date-based conditional logic, you can use the GP Conditional Logic Dates perk and then target specific days using merge tags, like:
- {saturday}
- {sunday}
4. Create Checkbox Products
With its native Product field, Gravity Forms doesn’t let you create checkbox products.
By using conditional logic, though, you can add a list of products where people can check as many products as they want. Gravity Forms will then accurately calculate the order total based on the choices a person made.
To create checkbox products in Gravity Forms, you can:
- Add a regular Checkbox field that lists each product choice.
- Create a single Product field for each item in the checkbox.
- Hide the Product fields from end users using CSS.
- Use conditional logic to only “show” a Product field when a user checks the corresponding box.
5. Assign Different User Roles During User Registration
Because Gravity Forms lets you use conditional logic in your form’s feeds, you can process user registrations differently based on a user’s input in the form.
For example, you can assign one user role to users who register with an email from your business’ domain while assigning a lower user role to people who register with third-party email addresses.
To set this up, you’ll need to:
- Create a user registration form using the Gravity Forms User Registration add-on.
- Create a user registration feed that assigns the relevant user role.
- Use the Registration Condition feature to apply conditional logic. In this case, you’ll only register the user if their email address contains “@yourdomain.com”.
- Create additional user registration feeds to handle third-party domain names and assign the relevant user roles.
You can extend this functionality further with the GP Auto Login perk, which lets you automatically log in users after they submit the form.
6. Display Different Confirmation Messages
You already learned how to send different notifications using conditional logic. But with the Gravity Forms conditional shortcode, you can also use conditional logic in the form confirmations that appear immediately after a user submits a form.
The basic shortcode snippet is as follows:
You can use any field in your form as the logic and customize the message by editing the text.
With the GP Preview Submission perk, you can also include conditional logic in HTML fields using this shortcode.
7. Change a Feed’s Submit Button, e.g. Dedicated “Pay Via Stripe” Button
For some forms, you might want to use a different “Submit” button based on a user’s choices.
For example, if you’re using the Gravity Forms Stripe Add-On plugin, you could change the button to “Pay via Stripe” if people select Stripe as a payment method so that they know they’re going to be redirected to Stripe’s website.
To change the Gravity Forms submit button based on the feed, you can use this free plugin.
If you’re using multiple feeds, you can then use conditional logic to use a different feed based on a user’s choices (and thus change the submit button based on a user’s choices).
8. Show/Hide Fields Based on Whether a User is Logged In
If you allow registration on your site, it can be helpful to show or hide fields based on whether or not a user is logged in.
For example, you could combine this with the GF eCommerce Fields perk from above to offer special discounts to logged-in users.
To use a user’s logged-in status as a conditional logic value, you can create a hidden field to store the user’s login status. To populate it, set the Default Value equal to the {user:user_login} merge tag.
From there, you’ll be able to use that hidden field in your conditional logic rules. For example, showing/hiding the Discount field based on the field containing the user’s login status.
Get Started With Gravity Forms Conditional Logic Today
Mastering conditional logic in Gravity Forms helps you create better, more personalized forms and also improve your backend workflows when it comes to notifications and data processing.
By itself, Gravity Forms already lets you make powerful conditional choices.
Then, Gravity Perks extends that core functionality with new options to:
- Create conditional prices, including conditional discounts.
- Use dates, days of the week, and times as conditional logic rules for fields, notifications, and feeds.
- Populate data in a form based on users’ choices.
To get access to those new features, purchase Gravity Perks today.
Get all the Perks in one bundle! Buy Gravity Perks today and get instant access to all 33 of our Gravity Forms plugins.
You can buy a single add-on or get access to all of Gravity Perks’ 32 add-ons for one low price.