This snippet is available as a plugin with Gravity Perks. Buy Gravity Perks today to get this perk plus 22 other galatic Gravity Forms plugins!
You’re probably familiar with Gravity Forms conditional logic. That awesome feature that allows you to show or hide fields depending a set of custom conditions. One feature that isn’t yet support is date-based conditions. Or is it?
This method will allow you to show or hide any field based on a date. You can configure it to show/hide if that date has passed, has not passed or if you are currently on that date.
This tutorial is based on the following example. You are selling tickets to a conference. Tickets sold a week before the conference are $10. Tickets sold within a week of the conference are $15. Let’s dig in!
1. The Code
View this code snippet on GitHub.Copy and paste the above snippet into your theme’s functions.php file. This code enables you to populate a field on your form with the current date and time in the form of a UNIX timestamp.
It isn’t super important that you know what a UNIX timestamp is (the number of seconds since January 1, 1970) but it is important to understand that a timestamp is an integer. No weird date formatting just a really big number. For example, this post was published on March 1, 2013. The time stamp for this date is 1362117600.
Gravity Forms conditional logic can’t work with formatted dates but by converting the date into a number we can let Gravity Forms handle the rest.
2. Setting Up Time Stamp Field
Our timestamp snippet doesn’t do much on it’s own. We need to tell it which field to populate with the timestamp. Go ahead and open any form to which you would like to add this functionality and follow these steps:
- Add a new Hidden field and label it “Timestamp”
- Click on the “Advanced” tab to view the field’s advanced settings.
- Check the checkbox labeled “Allow Field to be Populated Dynamically”.
- Enabling the “Allow Field to be Populated Dynamically” option will reveal the “Parameter Name” input. Add this value
timestamp.
Awesome! Now this field is configured to be dynamically populated with the current timestamp any time the form is viewed.
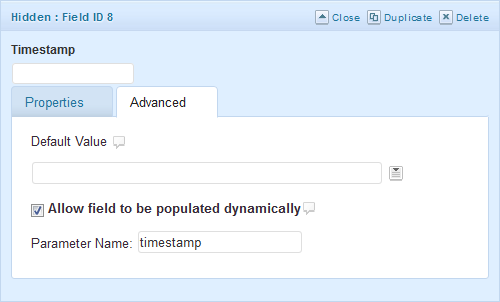 Timestamp Field
3. Setting Up Conditional Field
Now it’s time for the fun part!
- Create another field that you would like to which you would like to apply the date-based conditional logic.
- Click on the “Advanced” tab to access the field’s advanced settings.
- Check the “Enable Conditional Logic” checkbox.
- Select the “Timestamp” field from the first drop down.
- Select “less than” or “greater than” from the operator drop down depending on your intent (more details below).
- Enter the timestamp for the date this condition is based on (more details below).
For our working example, we will have two product fields. One with the early bird pricing (any time a week before the event) and another for regular pricing (any time within a week of the event).
The event is on March 18, 2013. We want the pricing to be dependent on a date one week before the event, so March 8, 2013 is our “conditional date”. The timestamp for this date (set to midnight) is 1362700800. Based on that conditional date, here is how each field’s conditional logic would be configured:
 Early Bird Product Field
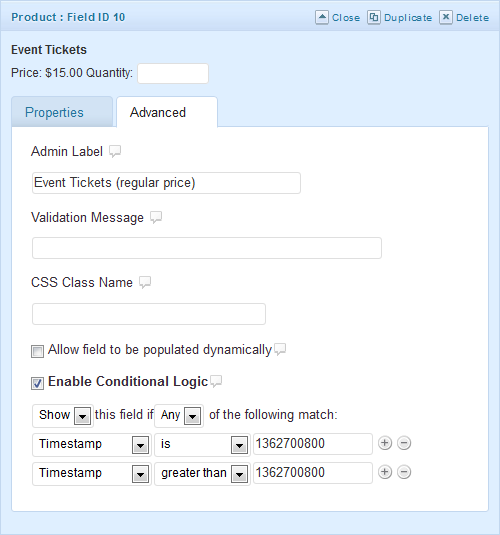 Regular Pricing Field
Should I use “less than”, “greater than”, or “is”?
If the field should show/hide if the current date is before the conditional date, you will want to use the “less than” operator.
If the field should show/hide if the current date is after the conditional date, you will want to use the “greater than” operator. You’ll note in the example, the regular pricing has an extra “is” clause. Without this, there would be one second at midnight on the conditional date that neither pricing field would display.
If the field should show/hide between two dates, you will need to create two conditions and use the “greater than” for the starting date condition and “less than” for the ending date condition.
How do I get a timestamp for my conditional date?
The conditional date will also need to be in the UNIX timestamp format. Use this online UNIX timestamp converter to convert the date you want to base your show/hide condition on to a timestamp. Once you have your timestamp, enter it into the last input on the condition row.


